 Team Buick Members Reference
Timing Your Buick Engine, Curving your Buick Distributor
This is a lesson on timing, Bob's style! Not a guarantee...
Before doing any of the following, if you have points, they must be accurately adjusted! Point gap effects timing! Requires a dwell-tach.
If you have a good running engine and just want something to go to the corner and back, just make sure your mechanical advance and vacuum advance is working.
- have a look in your distributor, make sure your mechanical weights are not worn out. Do they still "fit" on their mounting posts or are the holes worn out? Do they return nicely to their retard position? Do the springs appear in good condition?
- Give the shaft a little wiggle. If you feel more than a hair of side play, it probably needs new bushings.
- disconnect vacuum advance and plug the carburetor end.
- set your initial timing. Usually about 5 - 8 degrees BTC.
- check that your mechanical advance is working. Do this with a timing light. You have set your initial timing at say 6 degrees, rev the engine slowly and observe the timing. As the revs climb the timing should advance. Do this several times, and observe that the timing retards to the same spot each time, also, that the advance appears to be consistent each time. If it fails in either of these, your weights may not be in good condition or working properly. If you have an original system, you can expect it to creep slowly about 12 -16 degrees by about 3000 -3500 rpm. This will give a total mechanical advance of maybe 20 to 24 degrees. This is what you are operating on when you put your foot into it!
- check your vacuum advance. This is where you get your mileage. You will need a vacuum pump, they don't cost much and are readily available at any parts source. You can hook it up and pop the cap off your distributor and pump it up and watch the vacuum can pull the point mounting plate around, this will let you know it is working. When you stop pumping the vacuum should remain steady indicating no leaks.
Well that is all good and fine, but if this is what you do, you may have a fine running motor, but you are losing a bunch of power, and it is hand in hand with mileage! Yes you are losing both...
So let's give it a basic performance ignition tune-up
- Of course you still check the distributor weights for condition and give the shaft a jiggle. If you check your shaft end play (pull it up and down), you will probably find it is up at .020", way too much. You should shim it at the gear end to be .002" - .004". If you don't when you walk on it the shaft load will increase causing it to climb the gear and rotate. This will affect timing.
- Disconnect the vacuum advance and plug the carburetor end.
- Attach a vacuum gauge to a constant vacuum source.
- Roughly set the initial timing so that the engine runs.
- Advance the timing until maximum vacuum is achieved then retard it about one pound. Note the timing, this is your initial timing. It is not uncommon to find it at 10 or 12 degrees. It is where your engine wants to run nicely. This method compensates for the wear in the engine or the "new" performance cam you put in it.
- Now, for easy figuring let's say you are at 10 degrees. You want to be close to 35 degrees when you add in your mechanical timing and you want it all in at 2500 rpm. This means you need to find 25 degrees on your crankshaft from your mechanical advance or about 12 to 13 degrees in your distributor. You can do this with "curve kits available from performance sources. Performance distributors always have easily reset mechanical advance features. The idea is to keep playing until you get as close to 35 degrees of advance at no less than, but close to 2500 rpm.
Very often GM distributors are missing the small rubber bushing that slides over the mechanical advance limiter. Here you will see I have built a bronze one. The bronze was drilled with a #14 drill and then turned to .260". This gives a real solid limit to your advance curve where the rubber bushing would allow a couple of degrees of creep as the engine revs to its upper limits. When I installed my distributor I found that this combo gave me about 15 degrees of mechanical advance. Stock should have been about 16, so maybe the OD should have been .250". Of course I wanted more. I was aiming for 20 degrees plus. This would allow me to put my initial at about 10 or 12 and yield a mild streetable curve all in by 2500 rpm yielding 30 to 32 degrees total. (I may push this up a bit in future, but for now its a good starting place.)
After the bushing was installed I found that the movement allowed was about .080" yielding the 15 degrees of advance mentioned. The original hole measured about .345", I lengthened it to about .375" and reinstalled the distributor. I got about 18 degrees. I then lengthened it to a big .385" and got my 20 degrees.
Now here's a couple of hint on pulling and reinstalling a distributor so the car will probably start
without hassles!
- Note your number one plug lead on the cap. If everything is correct with a GM door type distributor, it should be the first hole counterclockwise from the door. If your working on some other type of distributor, take a felt pen and mark a line on the distributor body.
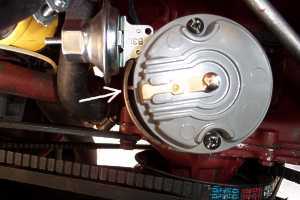
- Pull the cap and rotate the motor to tdc firing stroke. The rotor should look like the picture, and be in line with that casting ridge in the distributor body.
- Now you can pull the distributor and when you put it back in so the rotor is in the right place you will be able to just turn the housing to this position and it will probably just fire right up for timing.
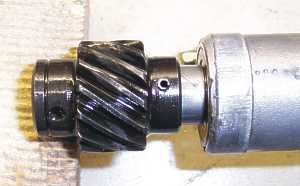
- Before you punch out the distributor gear spring pin, rotate the rotor to number one firing, then note the punch hole on the gear. Mark the housing in line with it. The gear has 13 or 14 teeth, so if you want to put it all back together so everything works nice you will want the gear on the right way, not a half a tooth out!
Now the first test drive... Don't hook up your vacuum advance, take it out and find a hill. load the engine and see if you can make it "ping". If you can, you have too much timing too soon and must back it off somewhere.
 Don't break any laws!
Now it's running just great, but you didn't drive it too far so you didn't notice what a gas hog you had! We fix that with the vacuum advance. The only time the vacuum advance works is when you come off full throttle and begin to build vacuum for cruising. Your engine load decreases, vacuum increases and the engine gets more advance. On most older engines the vacuum is "ported" vacuum which means it is not in use when the engine is at idle. On many newer engines the vacuum is kept in at an idle to reduce emissions.
Note: Vacuum advance does not hinder performance. Most "race cars" do not use them because they spend all their time at full throttle and would not have the opportunity to benefit from one. Any vehicle which spends any amount of time at part throttle benefits immensely from a vacuum advance!
What you are looking for from your vacuum advance is all the timing you can get without the "ping"! If you are running a lower compression engine, you may not be able to get a ping. Do not exceed 55 degrees total advance. Total is initial plus mechanical plus vacuum. This means you are probably looking for close to 20 degrees of vacuum advance. The closer you can get to the 55 degrees without the "ping", the better your mileage. You can modify most vacuum cans with a small file to allow the control rod to travel farther.
Remember:
It's O.K. to hear a rattle while you are playing with it, but don't rattle it unnecessarily.
You are doing this on a nice spring afternoon, cool temperatures allow more timing! What this means is you did a lot of work getting it just right and next weekend when it gets hot and you go cruising your baby develops an annoying "ping". You may have to back off your timing a bit on a hot day. You may want to guard against the problem by assessing your temperature and allowing a few degrees buffer. I would suggest to be a fairly safe cruiser about 32 degrees initial and mechanical and probably 50+ total with vacuum.
Benefits of an After Market Distributor!
- Many have bearings! This means they last a long time and do not develop shaft play. If you have ever seen a scope with the unsteady pattern of an original equipment distributor you will love watching a bearing distributor with its rock steady pattern!
- No bouncing points! They give consistent dwell at high rpm when most point distributors are having trouble coming home. This affects timing, and coil recovery time.
- Usually they have an easily adjustable mechanical advance allowing accurate changes in the curve.
- They have adjustable vacuum advance. Adjustable vacuum advances are also available for your O.E. distributor.
These specifications can be used as good starting point on any automotive engine.
So, this Sunday, open the garage door crank up the tunes, grab whatever you keep in your cooler and enjoy bringing in your timing.
|
Form 409-1-55
INSTALLATION INSTRUCTIONS
DYNA-FLYTE MODEL 855-D
DUAL POINT
Precision Ball Bearing Distributor Plate
For Delco-Remy distributors having a moveable circuit breaker plate
TO INSTALL MODEL 855-D:
- Remove breaker plate already in distributor. Retain nut, bolt, screw and terminal lead wire from the old set of points.
- Install two sets of Delco-Remy points, or their equivalent, on the Dyna-Flyte plate, using the copper connector strip supplied in kit.
- A special primary terminal with insulators is furnished with this kit, already assembled with a special flexible lead wire which should first be connected to the set of points furthest away from the vacuum advance arm terminal.
- Install plate assembly in distributor using screws and washers supplied. Then install the new primary terminal assembly in the slot in the distributor casting and tighten securely. Make certain that the fiver insulators are positioned correctly so that the distributor cap will seat properly over the outside rim of the distributor.
- Mount condenser on bracket supplied and install on the outside of the distributor at the cap clip hole nearest the primary terminal. Attach condenser wire, and original terminal lead wire retained from the old set of points, to primary terminal on the outside of the distributor.
- Install ground wire in its original position. Use a cam lubricant behind each point set rubbing block to reduce friction and wear.
- Set point gap at .018" on each set of points if using a feeler gage, or set each set of points at 27° dwell if using a dwell meter. The total dwell or cam angle of the combined sets of points will be 34°-35°.
- The first set of points, which is the set of points closest to the distributor primary terminal block is the break set. Time the engine in the usual manner.
RENBERLES PRODUCTS
Detroit 28, Michigan
|
