Authored by Wes Vann, Revised October 7, 1998 (maybe a little more clear and includes more information on conversion to "CS" alternators.
BUY A 105 AMP "CS" ALTERNATOR!!!!
PLEASE NOTE; Always disconnect the battery when doing electrical work on your car!
What I'm going to try to cover is the conversion from an external regulator alternator to a more new "SI" internal regulator alternator. In the latter part of the page, I'll cover changing over to a new "CS" alternator.
I first did the "SI" conversion on my 64 Chevelle using an old alternator that I had around the garage. The bracket configuration is similar to what is in a 69 Camaro (long water pump and the alternator mounted on the shotgun side of the engine).
After the car was on the road for a while, the alternator started acting strange and the voltage output wasn't constant. That gave me a perfect reason to do the conversion to the new style "CS" alternator! There wasn't any problem with the wiring changes, it was just that the "SI" had seen it's years.
I have to add a word of caution here, the colors of the wires called out are the "standard" colors and I can't swear that your car's wiring loom matches. Please blame GM and not me!
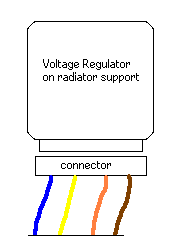
When you convert from the external regulator alternator, you no longer need the regulator that is mounted on the radiator support. You also don't need some of the wiring that is present in the loom.
The diagram below shows the original connection at the old regulator. (I'm sorry, but the wire that is colored yellow, is really white)

The next diagram shows how you modify the loom at this location.

Notice that the blue wire is jumpered to the brown wire. The white wire and the orange wire are just capped off so that they will not short out to anything.
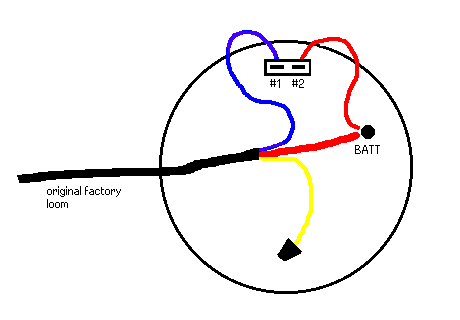
This next diagram shows what you have to do at the new alternator.

The wire that goes from the "BATT" terminal to the #2 terminal is a new wire that you will have to add. You can use a 14 gauge wire.
The white wire (shown yellow) just gets capped off.
You will need a new connector to fit the new alternator and they can be purchased at almost any auto parts shop.
Due to my being bothered by the "extra" wire being in the loom, I totally removed the dead white and orange wires. I also wired the brown wire to the alternator directly. It just gets rid of some extra length of wire.
The prior paragraph has caused me a lot of e-mail feed back and hopefully the following information will clear it up. In my final wiring configuration, the "brown wire" comes from the alternator indicator light, through the firewall connector, and directly to the alternator. The result is electrically the same as the diagram at the top of the sheet, just cleaner. The diagram above would have the brown wire coming out of the connector at the firewall, going toward where the regulator was, connecting to the blue wire, then the blue wire goes to the alternator. As I said, I cleaned up the wiring (and in the process, dirtied up the wording).
In order to ensure good connections, I recommend that you always solder the connections and then use heat shrink tubing to seal it.
"CS" alternators;
I just got done converting to a 105 amp "CS" alternator. It's fantastic and the conversion was a piece of cake. Here is the low-down;
I got mine from a local rebuilder that was recommended by my local auto parts store. I need to find out what car type, the configuration I got, was out of. I paid a little more than $110 for it and that included the $40 core charge and electrical connector. An "SI" alternator is only good for a $10 core charge and most rebuilders don't even want them. He didn't charge me to swap the pulley to a "v-belt" type. It has a typical "rebuilder" silver paint job that will have to be changed at a latter date.
There are two different physical sizes of "CS" alternators and I recommend that you stick with the smaller of the two. In stock configuration, you can get 105 amps and I feel that this should be more than enough unless you are running a "boom box" stereo playing rap music for the world (I don't like these people!).
The first thing that you have to look for is one that has the "straight flanges". What I'm talking about here is the mounting flanges. One of the flanges is for the pivot bolt. The other flange should be directly across from it and is for the bolt that goes in the slotted bracket. (I'm going to refer to this bolt as the tensioning bolt)
I asked the rebuilder what type (and year) car the alternator that I used came out of and here is the story. You want the alternator from a 89 through 93 full size GM truck. This includes the Bubs and Tahoe's. That's not to say that it wasn't used on other vehicles, I just didn't want to drive him crazy cross-referencing.
The flange for the tensioning bolt is tapped for a metric bolt. The bolt is 8mm and the thread pitch is 1.25 mm. You have to make sure that you get the correct pitch due to 8mm with 1.00mm pitch also being real common. Now you have to get one of those dang metric 13mm wrenches.
You really don't have to worry about the "orientation" of the connector (in the body) due to the fact that it's possible to unbolt the housing and rotate the rear cover.
As far as I know, all of the "CS" alternators come with a pulley for serpentine belts. When I got mine, I had the rebuilder just swap a "v-belt" pulley on it. It's the same pulley and fan as what is on a "SI".
Most of the connectors for the "CS" alternators are four wire. Don't worry!! You will only use two of them and the wiring is the same as the "SI" above!
On the connector that I got, there were four wires and the body of the connector had identification letters. Here are the id letters and the color wires (don't count on the colors to be the same as what you get).
"S", this was a heavy gauge, red wire.
"F", this was a small gauge, brown wire.
"L", this was a small gauge, brown/red wire.
"P", this was a small gauge, brown/white wire.
The red wire from "S" gets connected back to the output terminal of the alternator just like in the "SI" swap.
The brown/red wire from "L" gets connected to what is shown in the diagram above as the blue wire. It's this wire that comes (indirectly) from the idiot light and it energizes the alternator.
The wires from "F" and "P" are not used!
Mounting the alternator was just a remove and replace thing. The only bummer for my installation is that the spacer that goes between the block and the alternator should have an additional support bolt into the alternator (if using the "SI") and there isn't correct placement of the bolt hole in the "CS" alternator.
As an additional note; AC Delco sells a "conversion" wiring loom if you are changing from a "SI" to a "CS" and it is nothing but a few short wires and two connectors. One connector plugs into the existing wiring loom connector that was plugged into the "SI". The other new connector plugs into the "CS". What's real important to note is that there are two different types. One is "non-resistor" and the other has a resistance in it. You want the "non-resistor" one if you are going to keep the idiot light. Use the "resistor" one if you are getting rid of the idiot light. Be sure to read the "notes" section of this page before jumping!!
NOTES;
Why go through the trouble? Well, the "SI" alternators are easier to get and have a higher out-put. The "CS" alternators are even better!
What about those "single wire" alternators? From what I have heard from some very knowledgeable people, they tend to over heat and are not as durable. I also would question if the alternator light would function. Hey, it may be called an "idiot" light, but I'd rather it warn me about a problem then sit at the side of the road crying. While in an automotive electrical rebuild shop buying my new CS, the man said that the one wires really didn't have any overheating problems. So, I really don't know who to believe. He also said that it's possible to make up a "single wire" CS alternator.
And what about the idiot light? Well, the electricity that goes to energize the alternator (through the brown wire) comes from the idiot light. This leads to an interesting tid-bit, the alternator needs to see some resistance in this line. That resistance is the bulb! If you try to be "custom" and use a LED, there isn't the correct resistance and the alternator will not work correctly! You can't just by-pass the light!
Why can't I turn off my engine? You wired up the alternator wrong! Hey, it's only two small wires but you can swap them. What happens is that the output of the alternator feeds it's self and even though you turned off the ignition, as long as the alternator is spinning, it feeds the car and keeps running.