Buickspec6231
Active Member
Alright, so I figured after reading a bunch of other peoples build threads and I would make one of my own. I am working on a 1962 Buick Special Station Wagon (Model 4035). I bought the car in the summer of 2001 and have never driven the car. I was 16 at the time of purchase. It was originally equipped with the 198ci iron block V6. When I bought the car it had a heavy rod knock in what was supposed to be a rebuilt engine. After checking the journals with a micrometer it was determined that the crank would need to be turned another .010" which would bring the journals to being machined a total of .020". After checking around and even go to a local machine shop, no one was able to track down .020" undersized bearings. So, me being the overly ambitious 16 year old that I was I decided I was going to do a later model 231ci V6 engine swap. I figured how hard could it really be? Its another Buick V6 I figured it should just about a drop in swap. Errrrrr......wrong I was. Being young I didn't do much research for the project before I decided to tear right into it. The ultimate goal was more HP, 5 lug wheels and disk brakes in all 4 corners.
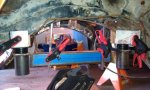
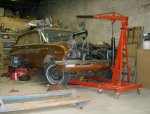
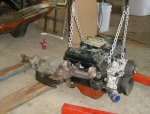
Well, I went to the local Pick-N-Pull and brought home a 1982 Buick 3.8l 231V6 out of a Regal. Attached to the engine was a BOP pattern TH-350. I tore the engine down, brought it to the machine shop and waited for its return.... Big mistake number 1. I never should have rebuilt the engine until all the mock ups were done. I never even started a mock up of the engine fit. Well engine comes back after rebuild and I start the engine fit. This is when I realized how much it sucked growing up without a garage to work in. Being at the mercy of the weather in Central New York is just about the most incovenient thing ever. Well, the engine was stored inside a shed which was elevated about 1 foot off the dirt so that means I couldn't just roll the engine stand outside. I had to use my Dad's 1953 Dodge M-37 Military truck which has a plow frame on the front with an extended boom on the lift cylinder. I had to use this boom to lift the engine from the shed and drive the truck around to the back of the shed where the car was sitting on the grass lawn. Then I had to use the engine hoist to remove the swinging wrecking ball of an engine from the truck's boom. Now I had to manage to roll the engine hoist around trying to keep it on a few pieces of plywood which were layed out on the grass ahead of time.
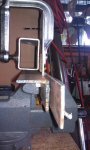
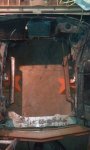
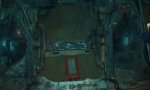
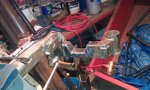
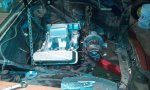
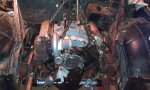
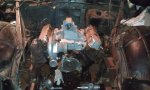
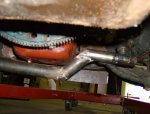
Fitting the engine didn't go any easier, The original frame mounts would not bolt up to the 3.8l's engine mounts. So first thing I did was cut them out. That required about 150ft of extension cord and an angle grinder. Awesome. Well got that part handled. Slowly set the engine down into the engine bay. Exhaust manifolds interfered with the steering gear box, oil pan hit the crossmember and the centerlink. Well, I wasn't going to give up, I kept trying moving the engine around moving it foward, backwards, even tried shifting the entire engine to the passenger side to clear the steering gearbox on the driver side. Finally found a location I thought it would work.
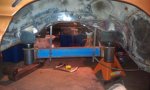
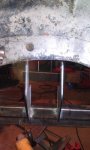
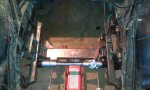
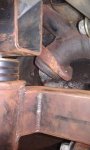
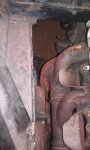
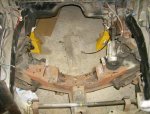
Good news, I was now working for a company which installed well pumps and water treatment equipment. The building we worked out of had a whole lot of extra room so my boss let me move the car into the building. This is when I started to be really able to work hard. Had the engine layed out where I wanted it so all the manifolds would clear, the oil pan hit slightly but could have just dented it in at that location to make it clear. Fabricated up these rediculous frame mounts that could have supported a 12V92 Detroit Diesel engine. I used to steel I had on hand. After I had these mounts all set up and welded in place I lowered the engine down and bolted it in. This is where my lack of experience really showed. I spent so much time looking at the bottom of the engine and its clearances, I never realized that the top of the engine was a about 3 inches higher then the closed hood would allow. Not going to work. I decided the best way to lower the engine and clear the crossmember and the centerlink was to make drop sections in both to allow extra clearance. Cut a section of the crossmember out, welded in a drop to the center link. Thought everything was going to work alright. Still wouldn't clear the u-joint in the steering shaft. Back to the drawing board again.
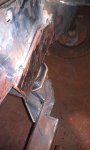
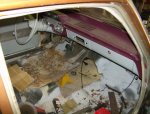
In the midst of finding out the engine was going to be a problem to fit, The TH-350 has a significantly larger case then the old Dual Path did. So this transmission wouldn't clear the floor pan. So, chopped the floor pan a little, which wasn't a big deal because there were some small pinholes that would need repair anyway. (I'm about 20 years old by this time.)
I then decided that maybe it was time to use a sub-frame from another car which would put the steering gear box on the outside of the frame or even a rack and pinion setup. I went to the junk yard again and busted out the tape measure of some of the passenger cars to check widths of the subframe and also the wheel mating surface to wheel mating surface dimensions. I couldn't find anything that I felt would work.
Took a long break off from working on the car after I started working about 80hrs. a week during the summers, then college fulltime while working fulltime. Finally finished college (2 yr A.A.S in Criminal Justice) and off to The United States Coast Guard basic training in Cape May, NJ. (Was USCG reserves). Came back from Basic, and A-School just about X-mas time. When I came back I got a job at a local Frieghtliner Dealership in the fabrication department. Most of the work we did was mounting plow frames and dump bodies on Frieghtliner and Sterling Trucks for municipalities. Pretty fun work. It was doing this work that I got much better at welding, I started to understand the whole fabrication art a little bit more. It really opened my eyes. I also learned some basic electical wiring and hydraulic principles as they were all part of the installation of the plow and dump equipment. Also, nothing boosted my confidence in my work more than cutting holes and welding all sorts of things to trucks that probably cost about $130k. Much different than working on my car. Life got in the way further and I had now moved on from the truck dealership to pursue a career in law enforcement. More time off from the car. Now I rent a duplex with a buddy from High School. The duplex has a 3 car detached garage that we get access to half of. The land lord lives in the other half of the duplex. So I wasn't too worried about my tools and car. So over came the car and all my tools, which now after working in a truck shop has multiplied.
Back to the car and no more side bars...
I had been watching those crappy Spike TV car shows one Saturday morning and saw that there was a company which was selling a Mustang II front suspension that you welded up yourself and it could be adapted into any vehicle and was available in 3 different track widths to accomodate a very large variety of vehicles. I knew that the hotrod guys have been using the Mustang II suspension in everything because it works well with engine swaps and has rack and pinion steering which would help eliminate one of my problems from the get go, steering component interference.
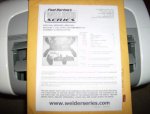
( The company selling the Mustang II crossmember referenced above is Paul Horton's Welder Series. http://www.welderseries.com/blog/ .... Pretty awesome stuff this guy makes and sells, definently worth checking out.)
Well at this point, I still hadn't mounted an engine in the car. I had developed a small case of the nailhead bug and wasn't sure if I wanted to continue the boring V6 swap or go with a 401/425 nailhead. I opted to stick with the V6. Now that I was cured of the nailhead bug, and I have a recent case of Turbo fever. So I have been collecting all the engine components needed to build a 3.8l turbo powered 1962 Buick Special Station Wagon. I would be combining the fantastic visual appeal of the 60's era Buicks with the legendary power from the 86-87 T-Types and Grand Nationals. (Sweet! The cost just increased exponentially and I still only have a basic understanding of vehicle electronics. I thought I was in over my head long before this crazy revelation.)
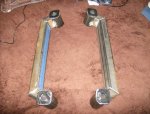
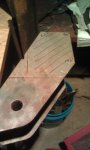
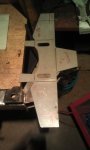
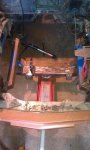
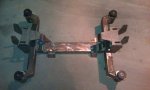
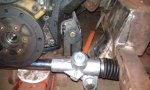
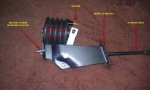
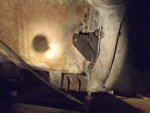
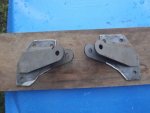
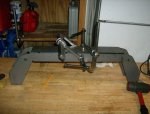
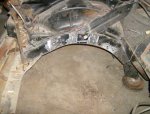
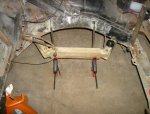
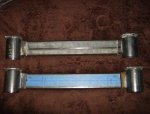
Well I ordered one of the 56" track width kits from Paul Horton along with disk brake caliper brackets to mount front rotors from a chevy camaro. (Bam!!! There is my 5x4.75" bolt pattern up front.) I had a plan on how I was going to mount the crossmember in the car. The problem with the Buick Specials and Skylarks from '61-63 is that they are a uni-body vehicle, so it doesn't have a traditional frame to it. Well I came up with plan. I was going to make narrowed subframe rails out of rectangular tubing to weld the mustang II crossmember to. This is the phase of the build I am at now..... so far so good, but I won't know until I get a little bit further along and actually set the engine in proximity to the car. But at this stage of the build I measure 30 times and cut once, I draw everything out on paper (I am not an artist, and only I can figure out what I mean in the drawings.) Any bracket I make I do in cardboard first, then transfer that to poster board. Then the poster board templetes get saved in a nice collection of information I have been collecting and stowed away. I even mocked up the narrowed rails using some lumber I cut to the same size as the rectangular tubing and added two pivot points to it allowing me to figure out exactly how I wanted the narrowed rails to be. I keep a (for lack of better terms) "journal" of what I have been doing with the car and document all the measurements and cross-reference the dated journal entries if I make any changes to a previous days work. I have been utilizing the connections I have made at my time at the truck dealership in ordering steel for the brackets and rails. (Saves A LOT of money compared to buying steel as a customer walking in to a steel suppliers warehouse). I now attack the project with a plan instead of an ego. It's been 10 years since I bought the car, and I have never even driven it. I love working on it. Its like therapy for me. At this point, I think I would be content if I never even finished the car and only worked on it, but ofcourse I am going to finish the car, I want to drive it!! So thats a rather abbreviated story of what I have been doing with the car. I will keep updating this thread on a regular basis, because my favorite threads are those which someone has used there own blood, sweat, tears, and ingenuity to do something which they and only they can say "I built that." Thanks for given my rambling a chance.
Well, I went to the local Pick-N-Pull and brought home a 1982 Buick 3.8l 231V6 out of a Regal. Attached to the engine was a BOP pattern TH-350. I tore the engine down, brought it to the machine shop and waited for its return.... Big mistake number 1. I never should have rebuilt the engine until all the mock ups were done. I never even started a mock up of the engine fit. Well engine comes back after rebuild and I start the engine fit. This is when I realized how much it sucked growing up without a garage to work in. Being at the mercy of the weather in Central New York is just about the most incovenient thing ever. Well, the engine was stored inside a shed which was elevated about 1 foot off the dirt so that means I couldn't just roll the engine stand outside. I had to use my Dad's 1953 Dodge M-37 Military truck which has a plow frame on the front with an extended boom on the lift cylinder. I had to use this boom to lift the engine from the shed and drive the truck around to the back of the shed where the car was sitting on the grass lawn. Then I had to use the engine hoist to remove the swinging wrecking ball of an engine from the truck's boom. Now I had to manage to roll the engine hoist around trying to keep it on a few pieces of plywood which were layed out on the grass ahead of time.
Fitting the engine didn't go any easier, The original frame mounts would not bolt up to the 3.8l's engine mounts. So first thing I did was cut them out. That required about 150ft of extension cord and an angle grinder. Awesome. Well got that part handled. Slowly set the engine down into the engine bay. Exhaust manifolds interfered with the steering gear box, oil pan hit the crossmember and the centerlink. Well, I wasn't going to give up, I kept trying moving the engine around moving it foward, backwards, even tried shifting the entire engine to the passenger side to clear the steering gearbox on the driver side. Finally found a location I thought it would work.
Good news, I was now working for a company which installed well pumps and water treatment equipment. The building we worked out of had a whole lot of extra room so my boss let me move the car into the building. This is when I started to be really able to work hard. Had the engine layed out where I wanted it so all the manifolds would clear, the oil pan hit slightly but could have just dented it in at that location to make it clear. Fabricated up these rediculous frame mounts that could have supported a 12V92 Detroit Diesel engine. I used to steel I had on hand. After I had these mounts all set up and welded in place I lowered the engine down and bolted it in. This is where my lack of experience really showed. I spent so much time looking at the bottom of the engine and its clearances, I never realized that the top of the engine was a about 3 inches higher then the closed hood would allow. Not going to work. I decided the best way to lower the engine and clear the crossmember and the centerlink was to make drop sections in both to allow extra clearance. Cut a section of the crossmember out, welded in a drop to the center link. Thought everything was going to work alright. Still wouldn't clear the u-joint in the steering shaft. Back to the drawing board again.
In the midst of finding out the engine was going to be a problem to fit, The TH-350 has a significantly larger case then the old Dual Path did. So this transmission wouldn't clear the floor pan. So, chopped the floor pan a little, which wasn't a big deal because there were some small pinholes that would need repair anyway. (I'm about 20 years old by this time.)
I then decided that maybe it was time to use a sub-frame from another car which would put the steering gear box on the outside of the frame or even a rack and pinion setup. I went to the junk yard again and busted out the tape measure of some of the passenger cars to check widths of the subframe and also the wheel mating surface to wheel mating surface dimensions. I couldn't find anything that I felt would work.
Took a long break off from working on the car after I started working about 80hrs. a week during the summers, then college fulltime while working fulltime. Finally finished college (2 yr A.A.S in Criminal Justice) and off to The United States Coast Guard basic training in Cape May, NJ. (Was USCG reserves). Came back from Basic, and A-School just about X-mas time. When I came back I got a job at a local Frieghtliner Dealership in the fabrication department. Most of the work we did was mounting plow frames and dump bodies on Frieghtliner and Sterling Trucks for municipalities. Pretty fun work. It was doing this work that I got much better at welding, I started to understand the whole fabrication art a little bit more. It really opened my eyes. I also learned some basic electical wiring and hydraulic principles as they were all part of the installation of the plow and dump equipment. Also, nothing boosted my confidence in my work more than cutting holes and welding all sorts of things to trucks that probably cost about $130k. Much different than working on my car. Life got in the way further and I had now moved on from the truck dealership to pursue a career in law enforcement. More time off from the car. Now I rent a duplex with a buddy from High School. The duplex has a 3 car detached garage that we get access to half of. The land lord lives in the other half of the duplex. So I wasn't too worried about my tools and car. So over came the car and all my tools, which now after working in a truck shop has multiplied.
Back to the car and no more side bars...
I had been watching those crappy Spike TV car shows one Saturday morning and saw that there was a company which was selling a Mustang II front suspension that you welded up yourself and it could be adapted into any vehicle and was available in 3 different track widths to accomodate a very large variety of vehicles. I knew that the hotrod guys have been using the Mustang II suspension in everything because it works well with engine swaps and has rack and pinion steering which would help eliminate one of my problems from the get go, steering component interference.
( The company selling the Mustang II crossmember referenced above is Paul Horton's Welder Series. http://www.welderseries.com/blog/ .... Pretty awesome stuff this guy makes and sells, definently worth checking out.)
Well at this point, I still hadn't mounted an engine in the car. I had developed a small case of the nailhead bug and wasn't sure if I wanted to continue the boring V6 swap or go with a 401/425 nailhead. I opted to stick with the V6. Now that I was cured of the nailhead bug, and I have a recent case of Turbo fever. So I have been collecting all the engine components needed to build a 3.8l turbo powered 1962 Buick Special Station Wagon. I would be combining the fantastic visual appeal of the 60's era Buicks with the legendary power from the 86-87 T-Types and Grand Nationals. (Sweet! The cost just increased exponentially and I still only have a basic understanding of vehicle electronics. I thought I was in over my head long before this crazy revelation.)
Well I ordered one of the 56" track width kits from Paul Horton along with disk brake caliper brackets to mount front rotors from a chevy camaro. (Bam!!! There is my 5x4.75" bolt pattern up front.) I had a plan on how I was going to mount the crossmember in the car. The problem with the Buick Specials and Skylarks from '61-63 is that they are a uni-body vehicle, so it doesn't have a traditional frame to it. Well I came up with plan. I was going to make narrowed subframe rails out of rectangular tubing to weld the mustang II crossmember to. This is the phase of the build I am at now..... so far so good, but I won't know until I get a little bit further along and actually set the engine in proximity to the car. But at this stage of the build I measure 30 times and cut once, I draw everything out on paper (I am not an artist, and only I can figure out what I mean in the drawings.) Any bracket I make I do in cardboard first, then transfer that to poster board. Then the poster board templetes get saved in a nice collection of information I have been collecting and stowed away. I even mocked up the narrowed rails using some lumber I cut to the same size as the rectangular tubing and added two pivot points to it allowing me to figure out exactly how I wanted the narrowed rails to be. I keep a (for lack of better terms) "journal" of what I have been doing with the car and document all the measurements and cross-reference the dated journal entries if I make any changes to a previous days work. I have been utilizing the connections I have made at my time at the truck dealership in ordering steel for the brackets and rails. (Saves A LOT of money compared to buying steel as a customer walking in to a steel suppliers warehouse). I now attack the project with a plan instead of an ego. It's been 10 years since I bought the car, and I have never even driven it. I love working on it. Its like therapy for me. At this point, I think I would be content if I never even finished the car and only worked on it, but ofcourse I am going to finish the car, I want to drive it!! So thats a rather abbreviated story of what I have been doing with the car. I will keep updating this thread on a regular basis, because my favorite threads are those which someone has used there own blood, sweat, tears, and ingenuity to do something which they and only they can say "I built that." Thanks for given my rambling a chance.
Attachments
-
 HPIM0248.jpg40.6 KB · Views: 69
 -
 HPIM0237.jpg41.1 KB · Views: 80
 -
 HPIM0235.jpg46.2 KB · Views: 84
 -
 HPIM0236.jpg45 KB · Views: 93
 -
 HPIM0556.jpg25.2 KB · Views: 71
 -
 HPIM0260.jpg32.4 KB · Views: 72
 -
 HPIM0558.jpg33 KB · Views: 74
 -
 HPIM0569.jpg40.6 KB · Views: 68
 -
 HPIM0576.jpg41 KB · Views: 81
 -
 subframe rail 4.jpg34.5 KB · Views: 76
Last edited: