52 Special - Let's try to resurrect a survivor

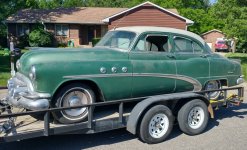
Found a 52 4-door Dynaflow-equipped Special Deluxe at a garage sale. Appeared to be fairly original. Not running for at least 15 years. Engine was lightly stuck. Fuel system completely bypassed. I grabbed the belt, pulled (carefully) on the fan, and the engine popped loose. Interior was actually nice. The owner said her parents bought it in 1954, so call it a "2-owner" car.

Now, I've never been a GM guy. Nevertheless, and I have no idea why, it grabbed me hard. After stewing on it for a couple of weeks, my wife basically said "go ahead, you know you want to". So, I did.

Let's see if I can journal some of my initial attempts at getting this old girl back on the road. If nothing else, putting my thoughts down here might keep me honest. ;)

Pickup and drop-off - per the previous owner, this is the first time the car was outside since (at least) 2010:

Picking_her_up.jpg
Trailered_Home.jpg

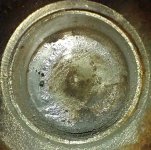
There will be "challenges". The cooling system is a little suspect:
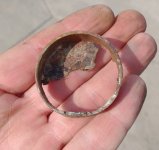
Freeze_plug_might_leak.jpg
Rad_slightly_plugged.jpg

But, it's all there, and it doesn't look TOO bad otherwise. Will see where this takes me.
 
Went through a pre-ignition review. Coolant (temporarily replaced a couple of rotted-out freeze plugs with rubber expand-o-plugs). Oil - full, smelled and looked OK. Same with transmission - nice and red. Sanded oxidation off the points, eyeballed the gap - looked reasonable. Pulled plugs - they all looked the same. Borescoped cylinders - they actually look "good". Squirted a little ATF in the jugs, turned the engine over 2 full rotations with a wrench on the front pulley. Borescoped thru the oil fill - looks surprisingly clean. Traced wiring, at least far enough to get 6V to the coil and power to the starting circuit. Came up with a 3EH battery (Garnett Auto Supply for the win!). Tested - yes, it cranks (using the stock switch), yes, the oil pressure gauge started moving, and yes, there's spark. The previous owner had disconnected the fuel system and set up a 12V clicky-clack pump on a short hose and filter - so a 1 gallon fuel jug, motorcycle battery and jumper leads filled the carb.

It cranked right up, no drama, and (son of a gun) she settled into an idle! Lifters a little noisy. Give her some gas and she starts to complain, popping back through the carb. Looking at the firing order conveniently stamped into the spark plug cover - 7 and 3 were swapped. Shut down, swapped those 2 wires, started back up - smoothed right out and now she'll take some throttle without complaint. Lifters pumped up, engine quieted down. Let it run until it started to steam. Had to keep pouring in water - radiator and water pump both leak badly.

Once hot: Jumped in and checked oil pressure...still in the upper part of the gauge. Checked transmission, have drive and reverse. Shut it down.

Drained the oil while it was still hot. No milkshake (whew!) Ran the borescope into the pan drain. Sludgier down below than it was up above (not surprising), but it's not as bad as I'd feared - should be OK.

Next steps:

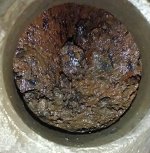
Most obvious - Need to go thru the cooling system. Leaky rad, leaking water pump (bad!), so much rust in the system that the top of the rad core looks like Oklahoma. Can't even see the passages.

Don't want to put a new rad in the car until I get most of the darned crud outta the system. Going to have to think on what to do next. Thinking I should be able to run it off of a hose, maybe. Pump 100+ gallons of water thru with the engine running and it might move some crud outta the system.

But she runs! Good oil pressure at idle even after she started heating up. Has drive and reverse, and sorta has brakes. Should be able to work with that.

Things I didn't do ... Didn't check to see if the generator was making any current. Didn't see brake lights or anything. Haven't gotten into the electricals at all except for the ignition and starter circuit. But that's fine, I'll get there.

If the engine holds together, if the head gasket holds, if I can clean up the water jacket and if I can keep it from overheating....I have a chance.

Not a bad evening's puttering!
 
Had one of those days today where everything I touched fell to pieces. Did you know...if you knock a bottle of Marvel Mystery Oil off of the bench onto concrete, the plastic will shatter? Well, I do now.

So there was a pint plus of Marvel onto the floor. Still had a half-cup in the bottom of the bottle. Fine, I'll pour that in the crankcase, might as well. As I was pouring, I saw the piece of plastic that had broken *into* the bottle...drop into the funnel and disappear. Ugh. Could SEE it with the borescope, but couldn't do anything about it.

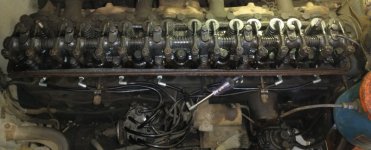
So that was my excuse to pull the valve cover and inspect, make sure every rocker bleed was wet, etc. All looks good. And the sliver of plastic? No problem, it's out.


Valvetrain.jpg


And then finished the oil change, slinging oil everywhere, it was comical.

Decided not touching anything else today would be for the best.

In the interim, I've ordered a cheap EBay rad (yeah, I'm sure I'm getting what I paid for, but I'll be darned if I'm going to pay to re-core the existing rad and then hang it off of this rusty engine! Maybe after I get it running and it proves itself in.), water pump (oldbuickparts), and a spool of AC Delco heater hose.

Next big event will be block-flushing. Trying to figure out where I can move the car easily (I'm on a bit of a hill) so I can get rid of the rust without staining the driveway. Still plotting. In the meantime, when I think I can pick up a wrench without *breaking everything*, I'll pull the rad and water pump.
 
Congratulations!!
Since you are admittedly not a GM man, stands to reason you are not a Buick man. So, a word to the wise. the Dynaflow transmission DOES NOT SHIFT as a Hydramatic does. When in drive , the torque converter does all the work. Give it a chance. Get used to it.

Where are you located

Ben
 
Yah - Hopefully I GET a chance!

Speaking of the Dynaflow - things you learn online. Surprised me, I didn't realize that (even in my lifetime) the automotive industry used by-gosh Whale Oil (sperm whale oil) in ATF. Crazy world!

I'm in South-Central Kansas - Wichita area
 
Went out over lunch today to start excising the radiator. Start simple, pull some hoses.

Top hose came off without much of a fight. Gee, there's a lot of rust there.

Top_Hose.jpg

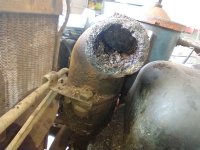
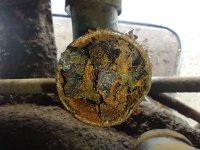
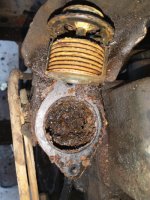
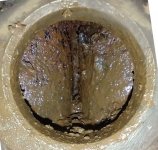
Then, I started in on the bottom hose. It fought me, and fought me, and fought me. Rusted, seized clamps, stuck-on, can't get it cut fully through to start tearing it off. Finally it relented. And this is what I found in the lower radiator neck:

Bottom_Hose.jpg

Well, THERE'S your problem! And down below, you can see there's more rust on the floor, and on the frame. So that's what I'm up against. No wonder she started to steam.

Now, I suspect that quite a bit of what is pictured here was actually stuck to the side of the hose, and my twisting/bending/wrenching on the hose knocked it down into the rad neck...that (on the suction side of the world) you wouldn't normally find that much stuff sitting in an OUTLET. That being said, I really wonder what I'm going to find in the pump inlet/outlet, up behind the thermostat (assuming it has one), and in the passages. Suspect she's really plugged. If so: Hopefully it's not concreted completely in place. Guess I'm going to find out!
 
Last edited:
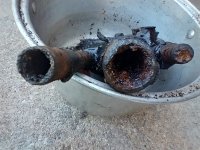
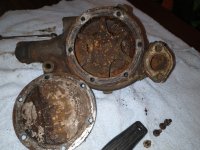
The water pump itself wasn't as bad as I'd suspected it might be - but then again, it's a pretty powerful pump, so it can move a lot of fluid.

The heater hose connections were plugged solid, no question. The inlet, the outlet, and the pump innards? There was a lot of scale in there, but it certainly wasn't as bad as I'd imagined.
Water_Pump_inlet.jpg
Water_Pump_Outlet.jpg
Pump_Guts.jpg

Don't get me wrong, it's *bad*, but like I said, I imagined worse. Like "completely plugged pump outlet".

Still have to get into the thermostat housing. Expecting some snoo there as well, we'll see.
 
OK, peeled off the thermostat housing. And yes, it's bad. I'm sure that there is enough gunk in the way to keep the water from circulating well enough to cool the engine completely, but I don't know how blocked it "really" was.

I unsurprisingly saw some gunk on top of the thermostat - which apparently is stuck in the open position (more on that later).
Crud_over_Thermostat.jpg

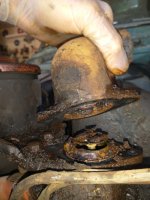
I'm not personally familiar with this sort of thermostat (looks like a large bellows arrangement instead of the little slug that I'm used to seeing in modern cars). But the concept is straightforward enough. Heat below the thermostat OPENS the thermostat and allows water to go through the radiator. Well, in this case the thermostat was ALREADY open. That's a GOOD thing, because below the thermostat, the little "shortcut" between the outlet on the head and the top of the water pump was completely blocked/concreted solid. So, the only circulation I was getting through the engine was due to whatever was making it by the (thankfully stuck-open) thermostat.
Crud_under_Thermostat.jpg

That picture makes it look worse than it actually was. The passage from the head wasn't completely plugged. Now, I can't be sure how restricted that was "overall" - guessing upwards of 80%, maybe 90% - but thinking that there still should've been enough circulation there to keep water moving through the engine. Not sure, though, obviously - a lot of gunk was surrounding the "bellows" of the thermostat, and there was a ring of crud in the neck above the thermostat that would've restricted flow as well.

But since the radiator itself had bad flow restrictions, I'm HOPING that's where most of the steaming was coming from - water being pumped out of the rad, pumped through the block, back through the head, forced through the stuck thermostat, back into the top of the rad, where it burps, overflows, etc. because the passages are blocked. And since the rad and the water pump leaks, having to keep pouring in water...and not sure that can keep up with the leaks/steaming because of the aforementioned blockage. Hope that's the case. Better than a bad head gasket or cracked water jacket, anyway!
 
And spent 2-plus hours digging my way through the block drain (right side of engine).

It was concreted solid. I'd read online that the drain passage should go between 2 cylinders - that I should be able to run a wire from the drain all the way through the "3rd" freeze plug. Even saw a video. Boy, I'm glad I got that reinforcement, because without it I would've given up.

Took a thin, long screwdriver, coat hanger, air compressor, brake cleaner, and elbow grease - and picked/twisted/ground my way forward. Kept blowing out the hole with compressed air, inspecting with my borescope, kept making (slow!) progress. Finally came up against what felt like "engine block". Cleaned out the hole as well as I could, and yes, it appears that when the drain hole was drilled (I assume that's how it worked), at the end of where it broke through to a casting void, there was enough (what appears to be) cast iron in front of the hole to catch my screwdriver. So I tweaked the tip of my coat hanger "up", and started picking again. Success! It slipped through into water jacket, and rusty water started to fall. Jobbed the hole out, and it now appears to be flowing freely.

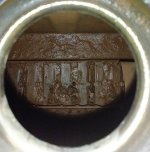
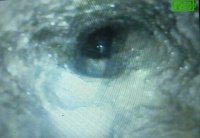
I wish I'd spent the extra for a borescope with a built-in camera. I tried taking some pictures of the screen, but it's not that good. Still, this should show (what appears to be) 2-3 "steps" in front of where the drain hole breaks through into the water jacket.

Block_Drain.jpg

This image is slightly rotated clockwise, the "steps" are at the bottom of the hole. You can kinda make out the "steps" below the dark section in the upper-center - the dark section is the breakthrough into the water jacket. The 3-ish "steps" below that appear to be completely solid (as in actual cast iron). They might not be, but they sure act like they're solid metal. The "steps" caught my screwdriver - couldn't dig through that. Tweaking the coat hanger upwards led to success.

I've already had to pull the front 2 freeze plugs because they were "lightly corroded" (heh). I've now resolved that I need to pull the rear block freeze plug, because that appears to be where the bulk of the crud ends up.
 
Last edited:
And spent 2-plus hours digging my way through the block drain (right side of engine).

It was concreted solid. I'd read online that the drain passage should go between 2 cylinders - that I should be able to run a wire from the drain all the way through the back freeze plug. Even saw a video. Boy, I'm glad I got that reinforcement, because without it I would've given up.

Took a thin, long screwdriver, coat hanger, air compressor, brake cleaner, and elbow grease - and picked/twisted/ground my way forward. Kept blowing out the hole with compressed air, inspecting with my borescope, kept making (slow!) progress. Finally came up against what felt like "engine block". Cleaned out the hole as well as I could, and yes, it appears that when the drain hole was drilled (I assume that's how it worked), at the end of where it broke through to a casting void, there was enough (what appears to be) cast iron in front of the hole to catch my screwdriver. So I tweaked the tip of my coat hanger "up", and started picking again. Success! It slipped through into water jacket, and rusty water started to fall. Jobbed the hole out, and it now appears to be flowing freely.

I wish I'd spent the extra for a borescope with a built-in camera. I tried taking some pictures of the screen, but it's not that good. Still, this should show (what appears to be) 2-3 "steps" in front of where the drain hole breaks through into the water jacket.

View attachment 16039

This image is slightly rotated clockwise, the "steps" are at the bottom of the hole. You can kinda make out the "steps" below the dark section in the upper-center - the dark section is the breakthrough into the water jacket. The 3-ish "steps" below that appear to be completely solid (as in actual cast iron). They might not be, but they sure act like they're solid metal. The "steps" caught my screwdriver - couldn't dig through that. Tweaking the coat hanger upwards led to success.

I've already had to pull the front 2 freeze plugs because they were "lightly corroded" (heh). I've now resolved that I need to pull the rear block freeze plug, because that appears to be where the bulk of the crud ends up.

There is no freeze plug on the BACK of the block. Four on the side.

Ben
 
Understood!

Agree- I see 4 larger freeze plugs on the driver's side of the block, 1 smaller plug on the front of the block up high (that appears to be hanging in there), and one on the back of the head (that I HOPE will hang in there).

I should have said "rearMOST freeze plug". The front 2 had already corroded through and have at least temporarily been replaced with expand-o-plugs The third and rearmost are hanging in there so far...but that appears to be where the crud congregates, so I'm steeling myself against the thought that at least the rearmost probably needs to come out just so I can excavate. But it looks hard to get to. So I'm not excited. At all!

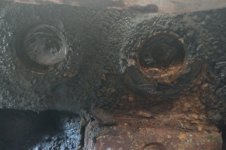
Update - scraped on the rearmost freeze plug some more, and darned if it doesn't look like barnacles are growing there. So I assume that indicates that it's going to leak once pressure/heat builds up, even if it doesn't seem to leak right now. So I guess, there's 2 reasons to get it outta there. Ugh.

I'll try to chip out the crusties and get down to good metal. See what's under there. I'm guessing pinhole at best.

rearmost_freeze_plugs.jpg
 
Last edited:
One would be dreaming to hope THAT will not leak. LOL.

Yep, that thermostat may well be an original. I remember those well.

Terrill Machine in De Leon, Texas will do that water pump I believe. It WILL be right.

Ben
 
I'll keep that in mind. This pump is...rough. Makes me wonder if evap-o-rust or some such could be brought to bear, it's pretty innocuous. Unsure.

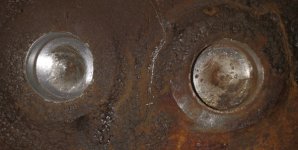
Finished scraping the marine life out of that rearmost block freeze plug, and while it looks a whole lot better than I *expected*, yeah, it also looks like it's pinholed and needs replaced. I'll clean a bit more and see what I see before I take the big hammer to it.

#3? Looks surprisingly good. Makes me suspect that the rear 2 freeze plugs have been replaced over the years. Almost had to be, given how shiny they buff out.

rearmost_freeze_plugs_2.jpg
rearmost_plug_detail_2.jpg

Upcoming: Going to take a break from the Buick for a bit, doing some vacationing stuff and won't be in the garage for a time. Will let parts I have ordered trickle in. Plan is to be rested, refreshed, and ready to jump back on it when I start up again!
 
Last edited:
And to close this one out - here's what's behind "door number 4". Got my work cut out for me.

Behind_Rearmost_Freezeplug.jpg

I know what I'm doing upon my return, I bet! :cry:

But the good news - it's not all concreted together, most of it is loose. This is the result of a few passes with a little magnetic pickup tool.

At_least_its_loose.jpg

So HOPEFULLY - once I can get the car rolled to someplace where I won't make an overwhelming mess - I can spend some quality time with a hose, brushes, wire, drain snake, pressure washer, heck, maybe dynamite -- and maybe I won't immediately plug the new radiator.
 
Last edited:
I live in Springfield mo I have a couple of old buicks 51 52 I have worked on old buicks since I was a kid if i can help you call me 417 751 3828 skip
 
Yes, the back end of the engine is where all the gunk builds up in these engines. Take extra care to get out as much as you can from this area.

Oh, and as mentioned previously, Terrill Machine absolutely WILL do a quality rebuild on the water pump. They've been doing them for over 50 years.
 
Back
Top